
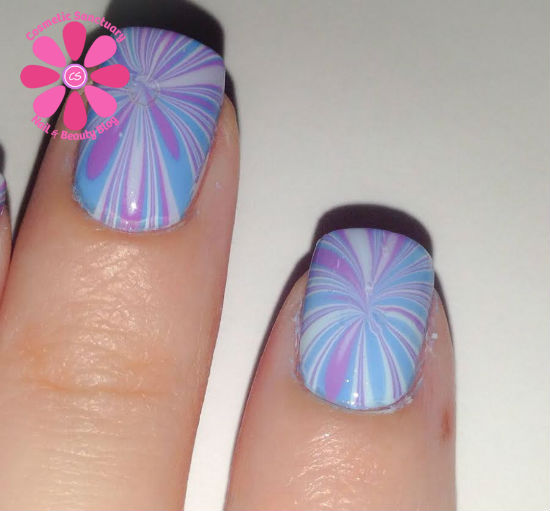
I got several requests to show how I did my Milani water marble this morning (and from sneak peeks last night) so I decided to give it picture tutorial a go.
It’s been awhile since I have done a tutorial, so hopefully this makes sense for everyone. If you have any additional questions, feel free to ask them in the comment section!
What I Used
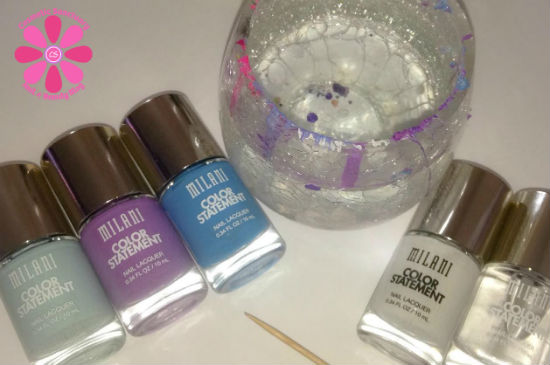
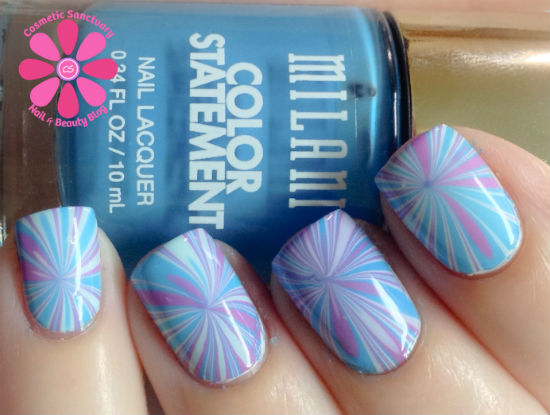
For this water marble I used my glass water marble cup (it’s well loved as you can see!), ROOM TEMPERATURE (this is important!) filtered water (I use bottled water, Crystal Geyser if you want to get technical, that has been left out on the counter), a toothpick, Milani Spotlight White as a base, Water Front, Imperial Purple & Mint Crush for the marble and Quick Dry Top Coat to seal it all up.
I do recommend using tape, Elmers glue or Vaseline to protect your skin and cuticles. Since I was only doing 1 nail for this tutorial I pretty much forgot to. This really helps for clean up after though and will save you time.
Step 1
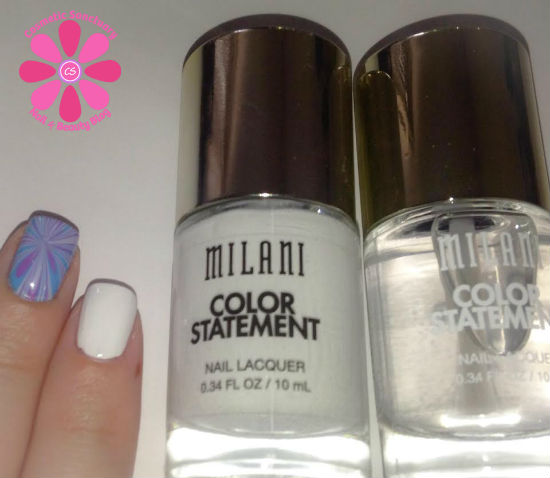
First I applied 2 coats of Milani Spotlight White as a base to make the colors pop. Once both coats were dry I added a coat of Milani Quick Dry Top Coat. Wait for your nails to dry completely.
Step 2
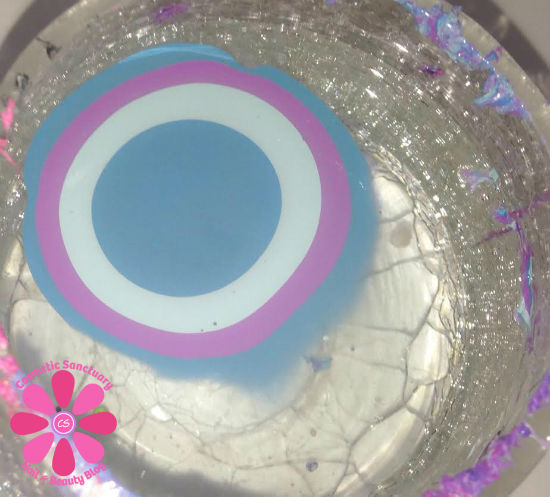
In your cup of room temp, filtered water start dripping your polish color by color, 1 drip at a time to form rings in the water. For this design, the more rings you can get, the better. 8-10 is ideal.
If your polish isn’t spreading into rings, or at all, you can add a couple drops of polish remover to your water. It is possible though that your polish isn’t water marble friendly, so it is a good idea to test each color before you really start by doing droplets in water as a test.
Step 3
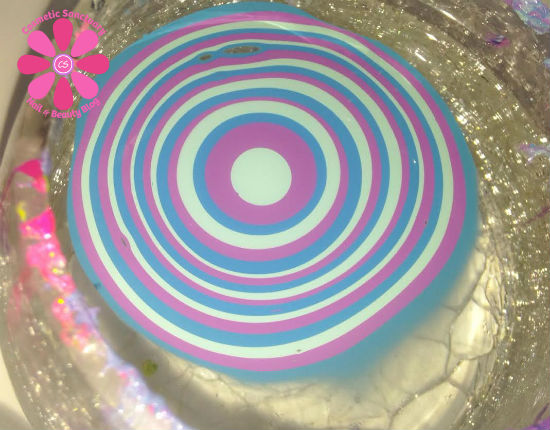
I managed to get about 18 rings before I was ready to make the design. The rings need to be made fairly quickly, otherwise the outer rings start to dry on the water and will pull. If you aren’t careful, you may snag your toothpick on a drying ring and ruin the whole circle of rings.
Step 4
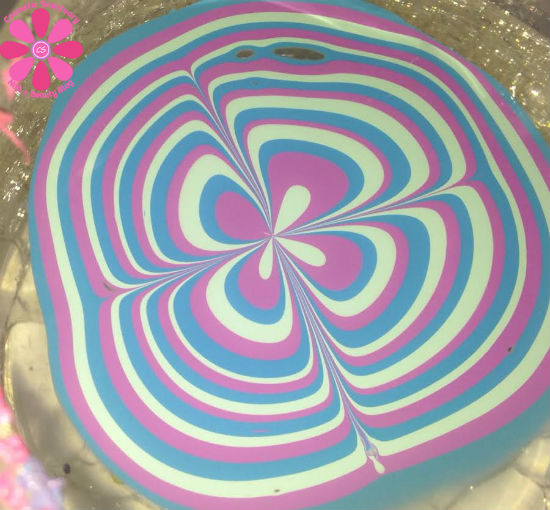
Start dragging your clean toothpick (needles work too) from an outer ring (I usually start about 3 rings in) towards the center of the design. I start at the top and move to the center, then bottom to center, then left to center and then right to center. You want to alternate which direction you go from, otherwise the circle will become lopsided and you will get an entirely different design.
Make sure to have a paper towel handy and wipe the toothpick between each drag. Each time you dip it into the design it should be as clean as possible.
Step 5

Keep dragging from the outer circle to the center until you have the desired pattern. At the end, dip the toothpick in the dead center of the design to “pull” the design together in the center.
Step 6
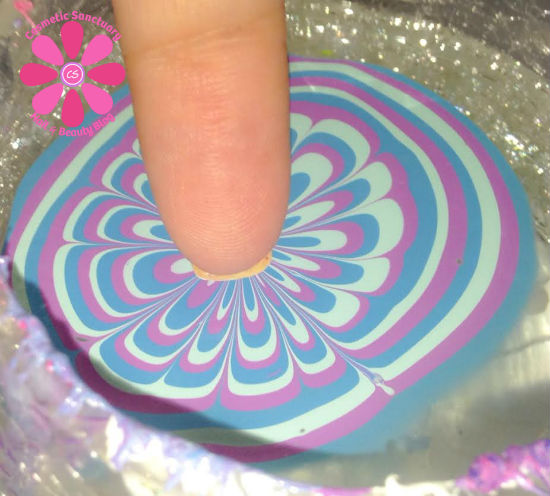
Position your nail over the desired area. Usually I use the outer edge that looks more like petals to get the loopy look. For this design though I want to use the center.
Step 7
Submerge your nail, face down, into the polish.
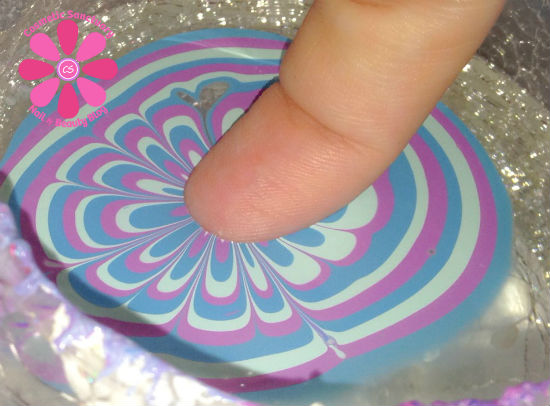
Using your toothpick, carefully dip it into the outer edge of the rings and gently swirl it into the water. This will help to pick up and remove excess polish that you didn’t dip the nail into. Once you have removed excess polish from the water, gently lift your nail out.
Step 8
You should have something like this once you lift out of the water. I used another toothpick to gently outline my cuticle area and separate the polish design from the skin and nail. If you applied tape, Vaseline or Elmer’s Glue, this part will be easier.
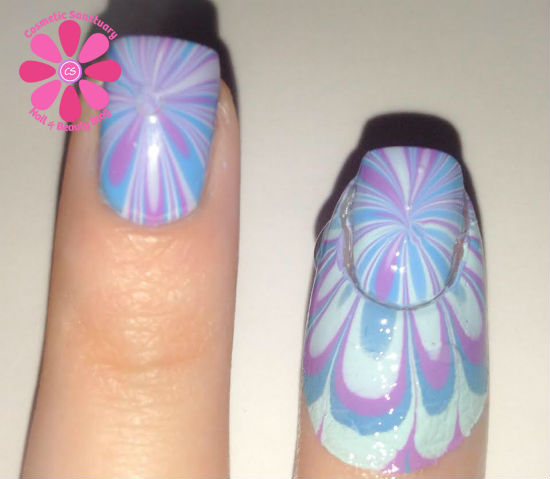
Done!
Since I did not protect the skin, I simply used a pointed cotton swab and some remover and cleaned up the skin. You can be really precise and keep at the skin and cuticle to clean it up, or do it my way and let it gently remove itself in the shower the following morning.
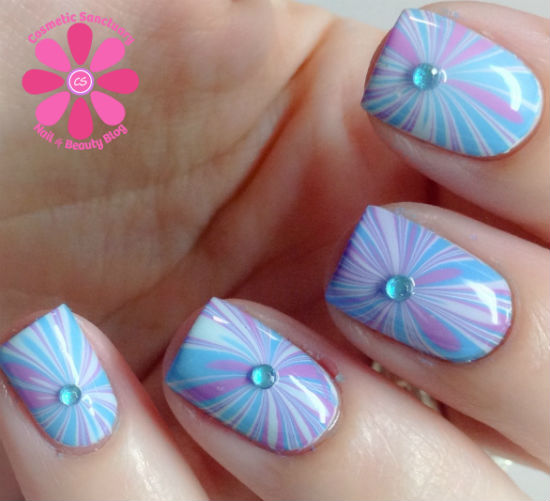
As I showed in my last post, I added fun gems to the center of the starbursts for added flair.
As I said earlier, if you have any questions, feel free to ask in the comment section. I will be happy to answer to the best of my ability.
Milani Color Statement Nail Lacquer Price: $3.99 Each
Where To Buy: Milani Website
Connect with Milani on Social Media: Instagram | Facebook |Twitter
Hope you enjoyed this, and I do hope to brush up on tutorial skills and move back into trying to make some video tutorials.
In case you want to pin a photo with no discussion, here is a collage of steps you can save:

Have a great night!

78 comments
They look great and you make it look so easy!!! Thanks for the picture tutorial
Thanks Deb! Can’t wait to see you next month!
Thank you for posting! I can not wait to try this!
I’d love to hear how it goes!
Thank you for the tutorial! When you posted this, I thought, there’s no way I could do that! But this breakdown makes it really easy! Thank you again!
You’re welcome! It’s not as bad as it sounds, but can take a little practice :)
I need to be brave and try a water marble! Love this!
It’s a little time consuming, but I always love the results!
This is hands down, the most gorgeous marble I’ve ever seen!
Aww thank you so much Noelle!
This is so fun! I am so uncoordinated at this kind of stuff, but I could try it on just one nail and see how it goes. Thanks for the tutorial!
A lot of times when I don’t feel like I have the patience for it, I will do a marble on JUST the accent nail to save time :)
I honestly thought these were nail stickers at first – holy moly… amazing job! I love this.
Thank you!
This is just soooooo pretty. Not sure if I have the patience to do 18 drops for each nail but surely I can do an accent nail or two!
Most of the time I do accent nails and they look amazing! When I have down time and am relaxing watching a movie though, I generally do full water marbles :)
Wow, what an amazing trick.
It’s fun, but time consuming!
That is so pretty! I am always looking for new nail art and I absolutely love this one!
Thank you so much!
Ohhhh this is so pretty!
Thank you Amber!
OMG, I love it! That really takes talent, I could NEVER do that and have it turn out so good!!
Aww thank you!
Seriously, wow. This is so cool! I can’t wait to try!
Thank you! I’d love to see the results!
Absolutely gorgeous!!
Thank you!
LOVE this!
Thank you!
Holy cow, these look incredible! I can only imagine the wild mess my nails would be if I tried to do this at home, haha.
Cat
Thank you! And it can get messy lol
I’ve seen a couple of photo tutorials on how to do this, yours by far is the best. but I’m having a hard time understanding the roll if the toothpick and how to use it exactly. Everyone describes how to use it differently so I’m kind of lost on that part. other than that bravo!! :-)
The toothpick is used to lightly skim across top of the polish to create the design. You only want to use the very tip of the toothpick to do this!
I love water marbling. I definitely love this color combination, it’s beautiful. I never heard of using elmer’s glue. Please do tell about that… do I wait for it dry around my nails first, I’m confused. Normally I try to use tape or I just clean up.
You paint the Elmer’s glue on your skin around the nail and on the pad of your finger and let it dry, then marble as normal! When it’s time to clean up it basically just peels off :)
You paint the Elmer’s glue on your skin around the nail and on the pad of your finger and let it dry, then marble as normal! When it’s time to clean up it basically just peels off :)
wow! that’s really awesome…i’ve never heard of this before at all! It actually is a lot easier than i expected!
Thank you! And it is fairly easy. It can get tricky with the water temp and finding polishes that spread easy for it
Question by a rank amateur here, please: This uses 18 drops of nail polish for each nail? On one hand, it seems like quite the waste. On the other hand, however, it makes for a fabulous excuse to go shopping for more nail polish!
I used 18 drops, but you can use 8-10 as well per nail. I have over 6,000 bottles of polish, so I guess I look at it more as “I’ll never use it all anyway”. You are right though, great excuse to go shopping for more ;)
I’m swooning over this design. Thank you for the thorough tutorial. So my understanding is that you’re going to have to create the rings over again for each finger, since you swirl the outer rings away after each nail?
Correct. It is very polish intensive which is why most people opt to use less expensive polishes to do water marbles. Some people do 3 fingers at a time too and have a different pattern on each nail
wow, this is gorgeous! pinning it to try later :)
Thank you! I’d love to see it if you do try!
Thank you for the toothpick tip!
All I can say is WOW. They came out great.
This is SO COOL. I don’t know if I could actually manage to do it properly but it’s pretty amazing!
oh, I wish it were that easy for me! great job!
Hail the nail art guru! I so love this design, one of my faves from you
You are a saint for staying up late to do this! Someone buy this girl some Joe~STAT! Thank you, Lisa. So helpful to read the fine details so I know it’s done right. When I FINALLY get any free time, I will do this and let you know if I succeed in my efforts. XOXO
This is nice! I remember when my sister was in HS, back in the late 90’s, and would do her own water nail designs. It’s funny how trends come back.
This is nice! I remember when my sister was in HS, back in the late 90’s, and would do her own water nail designs. It’s funny how trends come back!
In awe. I suck at watermarbling, no matter how hard I try. It’s one I just cannot conquer!
you make it look sooo easy!
I am forever envious of you – I have awful dexterity in painting my nails!
So pretty!
Thanks for the detailed instructions, this is so cool!
Wow, that looks amazing! I can’t wait to try this :)
What!!? This is SO cool! I want to try this
You did such a flawless job on this! It makes me crave starbursts LOL!
I am just afraid this would be incredibly messy! Do you feel like there is a lot of wasted nail polish after?
Wow, that looks super cool. I am horrible at nail design/art. All I can do is get a good base coat on and that’s about it. I’ll have to give this a whirl, I’m sure my daughter would think I’m the coolest mom if I did this with her. Then if I mess up it’s only on her tiny fingers. I don’t understand that last step — when your finger is in the polish and you use your toothpick to swirl in the water??
So fun!
This is so cool and unique. I’d love to try this.
Love this so much!! I have never been good at water marbling, definitely need to give it a try again!
I totally love this! I am sending it to my friend! I love the final product!
Ah! I will so have to try something like this
I’ll have to try this again, the first time I tried it…. it was bad.
I have always wanted to try this! One of my friends does tutorials online for marble art. It looks SO cool! Such pretty colors too!
LOVE the design! Definitely trying this.
This is seriously SO cool! I had no idea this was possible!
You make it look so easy. I know I would destroy it… ha
You made it look soooo easy but I know from many failed attempts that it’s not as easy as it looks. I still don’t want to give up though. I want to nail this!
This looks SO cool! I definitely would not have the patience for it. I always mess my poor nails up.
Can’t wait to try this! Hopefully mine turns out!
Gorgeous project- great blog ♥
Nice nail arts tutorial . i will must try this nail art thank you so much for share
Comments are closed.